Argo-Workflow : Kubernetes에서 Batch Job
argo workflow
Kubernetes CronJob으로 필요한 데이터 전처리를 할 필요가 있어서 사용했는데 진짜 이상했다.
InitContainer에 순서대로 Job들을 쌓아서 마지막 Container로 로그를 다 뱉어내고 찍어내는 식으로 만들었는데 디버깅하기 너무 힘들었다.
Argo Workflow를 사용 해야겠다 고 생각한 것은 스택오버플로우 링크 를 보고였다.
apiVersion: batch/v1beta1
kind: CronJob
metadata:
  name: cronjob-instantsearch
  namespace: modules
spec:
  schedule: "*/1 * * * *"
  jobTemplate:
    spec:
      template:
        metadata:
          annotations:
          sidecar.istio.io/inject: "false"
        spec:
          restartPolicy: Never
          initContainers:
          - name: s3-pull-assets
            image: amazon/aws-cli
            command: ["sh", "-c", "" ]
            volumeMounts:
            - name: persistent-storage
              mountPath: /efs
          - name: instantsearch
            image: preproc.21.04.27
            imagePullPolicy: Always
            args:
            - /bin/bash
            - "-c"
            - "sleep 10"
            volumeMounts:
            - name: persistent-storage
              mountPath: /efs
          - name: s3-push-assets
            image: amazon/aws-cli
            command: ["sh", "-c"]
            volumeMounts:
            - name: persistent-storage
              mountPath: /efs
          containers:
          - name: check
            image: amazon/aws-cli
            command: ["sh", "-c", "cat preproc.log" ]
            volumeMounts:
            - name: persistent-storage
              mountPath: /efs
          volumes:
          - name: persistent-storage
            persistentVolumeClaim:
              claimName: efs-claim2
1
What is Argo?
쿠버네티스 상의 병렬 잡 오케스트레이팅을 위한 오픈소스 컨테이너 네이티브 워크플로우 엔진이다. 아르고 워크플로우는 쿠버네티스 CRD(Custom Resource Definition)로 구현 되었다.
- 워크플로우의 각 단계가 컨테이너인 워크플로우를 정의한다.
- 순차적 태스크들을 멀티 스텝 워크플로우로 모델링하거나 DAG(방향성 비순환 그래프)를 사용해서 작업 간 종속성을 가지게 한다.
- 쿠버네티스에서 Argo 워크플로우를 사용해서 ML이나 데이터 처리를 위한 컴퓨팅 작업을 단기간에 쉽게 실행할 수 있다.
- 복잡하게 소프트웨어를 구성하지 않고 쿠버네티스에서 기본적으로 CI/CD 파이프 라인을 실행한다.
배치 프로세싱은 Job 단위를 반복적이고 자동으로 수행하는 것을 말한다. Job은 일반적으로 함께 그룹화 되고 배치로 처리 된다.
쿠버네티스에서 기본적으로 Job 실행을 지원한다. Job은 정해진 수의 완료를 받을 때 까지 여러 pod를 병렬로 실행할 수 있다. 각 pod는 단일 작업 단위로 여러 컨테이너를 포함할 수 있다. 근데 여기 까지다.
그러므로 Argo를 사용해서 몇가지 feature 기능을 추가해서 사용하고자 한다. 다음은 Argo를 사용했을때 사용할 수 있는 기능이다.
- 스텝 단위의 워크 플로우 선언
- 아티팩트 지원
- 스텝 단위의 입력 및 출력
- 루프
- 컨디션
- 대시보드를 위한 시각화
- 추가로 더 있다.
Argo CLI 설치
argo를 구성하기 전에 Command Line Tool을 설치하는 것을 추천한다.
export ARGO_VERSION="v2.9.2"
curl -sLO https://github.com/argoproj/argo/releases/download/$ARGO_VERSION/argo-linux-amd64.gz
gunzip argo-linux-amd64.gz
sudo chmod +x argo-linux-amd64
sudo mv ./argo-linux-amd64 /usr/local/bin/argo
argo version
Argo Controller Install
- deployment
- argo-server
- workflow-controller
- service
- argo-server
- workflow-controller-metrics
- configmap
- workflow-controller-configmap
- serviceaccount
- argo
- argo-server
- role
- argo-role
- rolebinding
- argo-binding
- clusterrole
- argo-aggregate-admin
- argo-aggregate-edit
- argo-aggregate-view
- argo-cluster-role
- clusterrolebinding
- argo-server-binding
를 생성한다.
kubectl create ns argo
kubectl apply -n argo -f **https://raw.githubusercontent.com/argoproj/argo-workflows/$ARGO_VERSION/manifests/install.yaml**
Configure the service account to run workflow
Argo가 아티팩트, 출력, 시크릿에 대한 액세스 등의 기능을 지원하려면 쿠버네티스 API를 사용해서 Kubernetes 리소스와 통신을 해야한다.
쿠버네티스 API와 통신하기 위해 Argo는 A ServiceAccount를 사용해서 쿠버네티스 API에 자신을 인증한다.
A에 사용하는 Role을 바인딩해서 Argo가 사용하는 권한을 지정할 수 있다.
데모에서는 관리자 권한을 부여한다.
kubectl -n argo create rolebinding default-admin --clusterrole=admin --serviceaccount=argo:default
아래는 Workflow를 위해 필요한 최소한의 Role이다 [ 참고링크 ]
apiVersion: rbac.authorization.k8s.io/v1
kind: Role
metadata:
  name: **default**
  namespace: argo
rules:
# pod get/watch is used to identify the container IDs of the current pod
# pod patch is used to annotate the step's outputs back to controller (e.g. artifact location)
- apiGroups:
  - ""
  resources:
  - pods
  verbs:
  - get
  - watch
  - patch
# logs get/watch are used to get the pods logs for script outputs, and for log archival
- apiGroups:
  - ""
  resources:
  - pods/log
  verbs:
  - get
  - watch
workflow.spec.serviceAccountName 을 선택하지 않으면 기본적으로 사용하게 되는 ServiceAccount 가 default 다.
Artifact
argo-workflow-repository를 위해서 s3 bucket을 만들고 configmap에 s3 bucket name을 patch 한다.
s3에 접근할 수 있는 권한은 있어야 한다. 이미 만들어진 workflow-controller-configmap에 patch를 해주면 된다. [ 참고링크 ]
apiVersion: v1
kind: ConfigMap
metadata:
  name: workflow-controller-configmap
  namespace: argo
data:
  config: |
    artifactRepository:
      s3:
        bucket: S3 버킷명
        keyFormat: S3 내부 경로
        endpoint: s3.amazonaws.com
Simple Batch Workflow
간단한 Batch Workflow를 /workflow/whale-say.yaml 파일에 저장하고 실행한다.
apiVersion: argoproj.io/v1alpha1
kind: Workflow
metadata:
  generateName: whalesay-
spec:
  entrypoint: whalesay
  templates:
  - name: whalesay
    container:
      image: docker/whalesay
      command: [cowsay]
      args: ["This is an Argo Workflow!"]
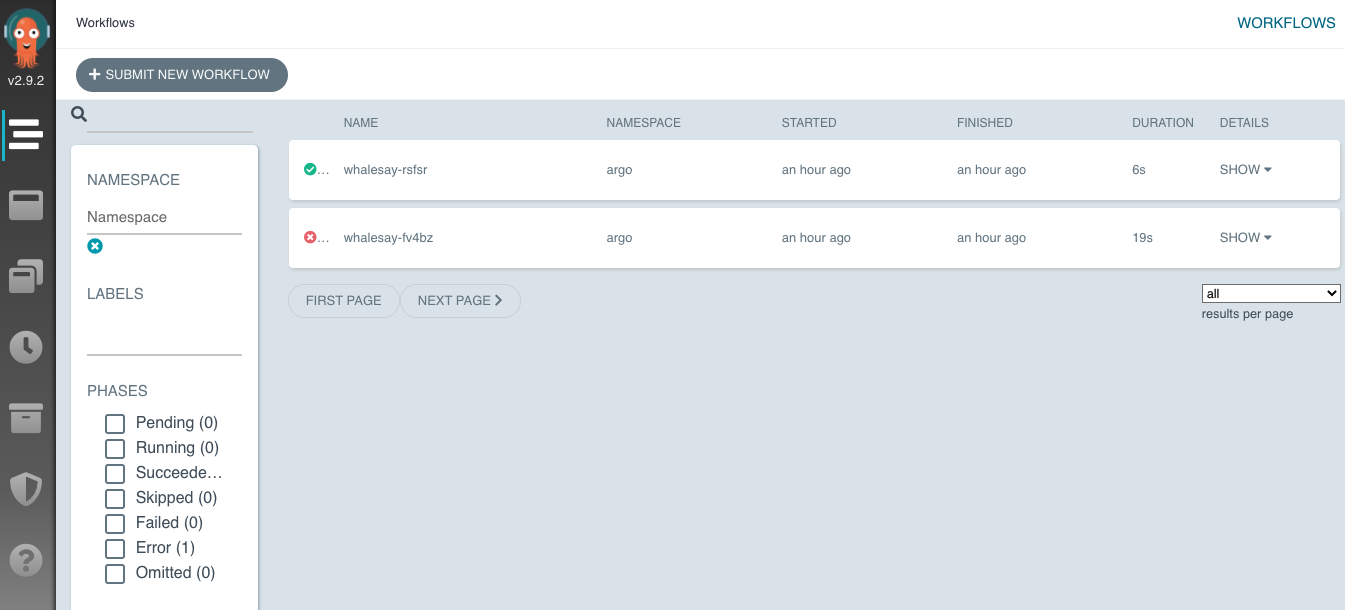
argo -n argo submit –watch workflow/whale-say.yaml 를 실행하면 아래와 같은 화면이 출력된다.
Name:                whalesay-rsfsr
Namespace:           argo
ServiceAccount:      default
Status:              Succeeded
Conditions:
 Completed           True
Created:             Thu Apr 29 03:23:56 +0000 (6 seconds ago)
Started:             Thu Apr 29 03:23:56 +0000 (6 seconds ago)
Finished:            Thu Apr 29 03:24:02 +0000 (now)
Duration:            6 seconds
ResourcesDuration:   3s*(100Mi memory),3s*(1 cpu)

STEP               TEMPLATE  PODNAME         DURATION  MESSAGE
 ✔ whalesay-rsfsr  whalesay  whalesay-rsfsr  4s
argo -n argo logs $(argo -n argo list -o name)을 통해 로그를 확인할 수 있다.
whalesay-rsfsr: 2021-04-29T03:24:00.587233599Z  ___________________________
whalesay-rsfsr: 2021-04-29T03:24:00.587255519Z < This is an Argo Workflow! >
whalesay-rsfsr: 2021-04-29T03:24:00.587258895Z  ---------------------------
whalesay-rsfsr: 2021-04-29T03:24:00.587261543Z     \
whalesay-rsfsr: 2021-04-29T03:24:00.587263683Z      \
whalesay-rsfsr: 2021-04-29T03:24:00.587265822Z       \
whalesay-rsfsr: 2021-04-29T03:24:00.587268747Z                     ##        .
whalesay-rsfsr: 2021-04-29T03:24:00.587271609Z               ## ## ##       ==
whalesay-rsfsr: 2021-04-29T03:24:00.587274580Z            ## ## ## ##      ===
whalesay-rsfsr: 2021-04-29T03:24:00.587277847Z        /""""""""""""""""___/ ===
whalesay-rsfsr: 2021-04-29T03:24:00.587281344Z   ~~~ {~~ ~~~~ ~~~ ~~~~ ~~ ~ /  ===- ~~~
whalesay-rsfsr: 2021-04-29T03:24:00.587283614Z        \______ o          __/
whalesay-rsfsr: 2021-04-29T03:24:00.587285779Z         \    \        __/
whalesay-rsfsr: 2021-04-29T03:24:00.587287990Z           \____\______/
WebUI로 접근을 할 수 있는데 argo-server 서비스가 ClusterIP로 만들어져 있을 것이다. NodePort나 LoadBalancer로 변경해준다.
apiVersion: v1
kind: Service
metadata:
  name: argo-server
  namespace: argo
spec:
  type: LoadBalancer
  ports:
  - name: web
    port: 2746
    targetPort: 2746
  selector:
    app: argo-server
그럼 AWS에서는 elb가 생성된다. 이쁘게 하고 싶으면 Route53을 붙이거나 애초에 Ingress로 사실 해볼 수도 있다.
마지막으로 WebUI 이다.
2
Auth Mode
지원하는 auth에는 server | client | sso 가 있는데 pod 을 deploy 할 때, install.yaml을 수정할 필요가 있다. 아무것도 하지 않으면 기본적으로는 server로 된다.
apiVersion: apps/v1
kind: Deployment
metadata:
  name: argo-server
spec:
  selector:
    matchLabels:
      app: argo-server
  template:
    metadata:
      labels:
        app: argo-server
    spec:
      containers:
      - args: ["server", "--auth-mode", "client"]
        image: argoproj/argocli:v2.9.2
        name: argo-server
        ports:
        - containerPort: 2746
          name: web
        readinessProbe:
          httpGet:
            path: /
            port: 2746
            scheme: HTTP
          initialDelaySeconds: 10
          periodSeconds: 20
      nodeSelector:
        kubernetes.io/os: linux
      serviceAccountName: argo-server
을 하면 auth token이 필요하게 된다. argo server pod에 auth token을 넣으면 된다.
kubectl -n argo exec -it ${argo-server-podname} argo auth token
그러면 WebUI에서 나온 결과를 그대로 붙여 넣으면 된다.
sso 모드는 OIDC(OAuth + JWT) 솔루션인 DEX가 필요하다.
CleanUp
모든 워크 플로우 제거
argo -n argo delete --all
Undeploy Argo
kubectl delete -n argo -f **https://raw.githubusercontent.com/argoproj/argo-workflows/$ARGO_VERSION/manifests/install.yaml**
kubectl delete namespacec argo